
How to make a DIY Fire truck with Arduino UNO R4 MINIMA board
Certainly! Here's a short description of the DIY Fire Truck project: **This project guides you through building a remote-controlled fire truck using an Arduino UNO R4 MINIMA board. Control the truck's movement and activate the water pump wirelessly using Bluetooth. This engaging project is perfect for beginners and allows for customization of the chassis and features.** This description is concise and highlights the key aspects of the project, making it easy to understand and appealing to potential builders.
SCIENCE PROJECTS
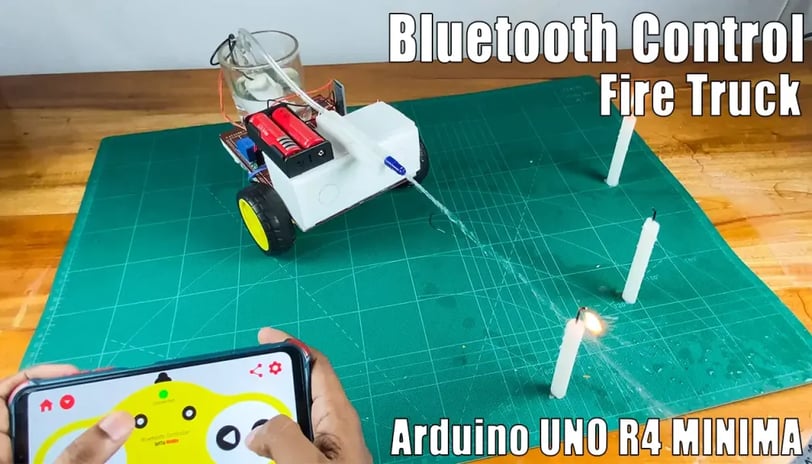
**"Welcome back! This project guides you through building a DIY Fire Truck using an Arduino UNO R4 MINIMA board.
Key Features:
Simple and Affordable: Easy to build and doesn't require expensive components.
Bluetooth Control: Wireless control using an HC-05 Bluetooth module and the SriTu Hobby Bluetooth controller app.
Remote Functionality: Control movement and activate the water pump remotely.
Customizable Chassis: Utilize a dot board (or your preferred material) for the chassis.
Efficient Motor Control: Employ an L298N motor driver for smooth and effective gear motor operation."
Key Improvements:
Conciseness: The text is more concise and easier to read.
Clarity: Key features and functionalities are clearly highlighted.
Structure: Information is presented in a more organized and structured manner.
Professionalism: The tone is more professional and engaging.
I hope this revised version is more effective!
OK, let’s do this project step by step. The required components are given below.
Arduino UNO R4 MINIMA x 1
L298N motor driver x 1
5v Relay module x 1
HC-05 Bluetooth module x 1
Gear motor x 2
Robot wheel x 2
Caster wheel x 2
Mini breadboard x 1
Mini water pump x 1
Mini water pipe 18650 battery holder x 1
18650 battery x 2
Dot board Jumper wires
Making Process: Step-by-Step
1. Gather Materials:
Arduino UNO R4 MINIMA
L298N motor driver
5V Relay module
HC-05 Bluetooth module
Gear motor x 2
Robot wheel x 2
Caster wheel x 2
Mini breadboard
Mini water pump
Mini water pipe
18650 battery holder
18650 battery x 2
Dot board
Jumper wires
2. Assemble the Chassis:
Mount the Motors: Secure the gear motors to the dot board using screws or hot glue.
Attach Wheels: Attach the robot wheels to the gear motors.
Add Caster Wheels: Attach the caster wheels to the front of the chassis for stability.
Secure the Electronics: Mount the Arduino board, L298N motor driver, relay module, and Bluetooth module to the chassis using hot glue or adhesive.
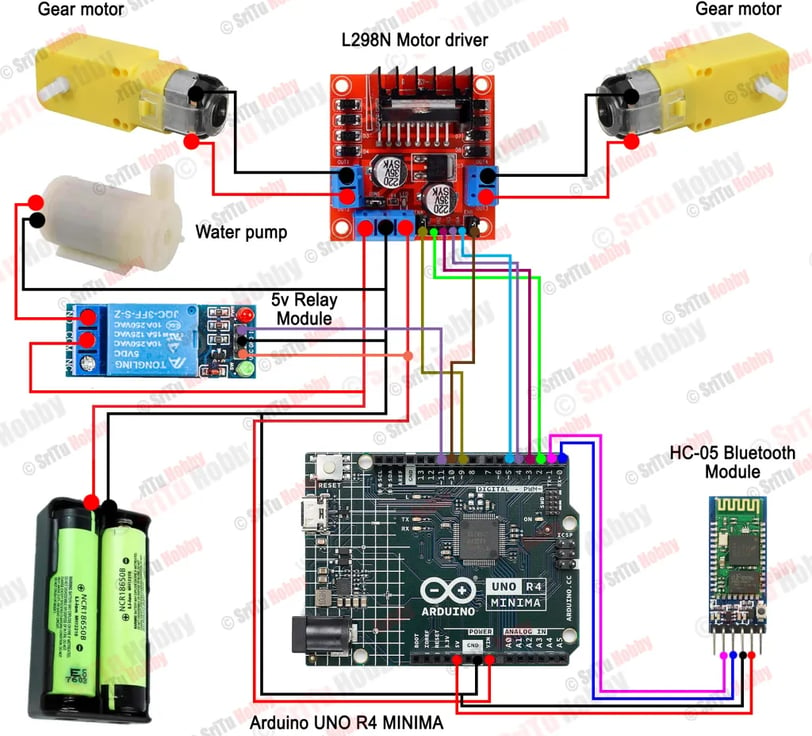
3. Connect Components:
Power Supply: Connect the 18650 batteries to the battery holder.
Motor Driver:
Connect the motor driver's power supply to the battery holder.
Connect the motor driver's output pins to the gear motors.
Motors: Connect the gear motors to the motor driver as per the wiring diagram.
Relay Module:
Connect the relay module's input pin to a digital output pin on the Arduino.
Connect the relay module's output pin to the water pump.
Bluetooth Module: Connect the Bluetooth module to the Arduino according to the module's specifications.
Sensors (Optional): If you want to add features like obstacle avoidance, connect the necessary sensors (e.g., ultrasonic sensors) to the Arduino.
4. Develop and Upload Code:
Ardiuno code:
#define IN1 2 #define IN2 3 #define IN3 4 #define IN4 5 #define relay 11 #define ENA 9 #define ENB 10 #define Speed 180 void setup() { Serial1.begin(9600); pinMode(IN1, OUTPUT); pinMode(IN2, OUTPUT); pinMode(IN3, OUTPUT); pinMode(IN4, OUTPUT); pinMode(relay,OUTPUT); digitalWrite(relay,HIGH); } void loop() { if (Serial1.available() > 0) { delay(2); char value = Serial1.read(); Serial.println(value); if (value == 'U') { Forward(); } else if (value == 'D') { Backward(); } else if (value == 'S') { Stop(); } else if (value == 'L') { Left(); } else if (value == 'R') { Right(); }else if(value == '1'){ digitalWrite(relay,LOW); }else if(value == '2'){ digitalWrite(relay,HIGH); } } } void Forward() { analogWrite(ENA, Speed); analogWrite(ENB, Speed); digitalWrite(IN1, HIGH); digitalWrite(IN2, LOW); digitalWrite(IN3, HIGH); digitalWrite(IN4, LOW); } void Backward() { analogWrite(ENA, Speed); analogWrite(ENB, Speed); digitalWrite(IN1, LOW); digitalWrite(IN2, HIGH); digitalWrite(IN3, LOW); digitalWrite(IN4, HIGH); } void Stop() { digitalWrite(IN1, LOW); digitalWrite(IN2, LOW); digitalWrite(IN3, LOW); digitalWrite(IN4, LOW); } void Left() { analogWrite(ENA, Speed); analogWrite(ENB, Speed); digitalWrite(IN1, HIGH); digitalWrite(IN2, LOW); digitalWrite(IN3, LOW); digitalWrite(IN4, HIGH); } void Right() { analogWrite(ENA, Speed); analogWrite(ENB, Speed); digitalWrite(IN1, LOW); digitalWrite(IN2, HIGH); digitalWrite(IN3, HIGH); digitalWrite(IN4, LOW); }
Write the Code:
Use the Arduino IDE to write the code.
The code should:
Receive commands from the Bluetooth module.
Control the motor driver to move the fire truck forward, backward, and turn.
Activate the relay to turn the water pump on/off based on the received commands.
Include necessary libraries (e.g., SoftwareSerial for Bluetooth communication).
Upload the Code:
Connect the Arduino board to your computer via USB.
Upload the compiled code to the Arduino board using the Arduino IDE.
5. Test and Calibrate:
Power On: Connect the battery holder to power the system.
Bluetooth Connection: Connect to the fire truck using the SriTu Hobby Bluetooth controller app.
Test Movement: Use the app to control the fire truck's movement (forward, backward, turns).
Test Water Pump: Use the app to activate and deactivate the water pump.
Calibrate and Adjust: Fine-tune the motor speeds and steering to achieve optimal performance.
6. Refine and Customize (Optional):
Add Enhancements:
Implement obstacle avoidance using sensors.
Add a water tank and a water spraying mechanism.
Include sound effects (e.g., siren).
Incorporate a camera for remote viewing.
Customize Aesthetics: Decorate the chassis with paint, stickers, or other creative elements to make it look like a real fire truck.
Note:
This is a general guide. The specific wiring and code will vary depending on your components and design choices.
Refer to the datasheets of the components for detailed specifications and pinouts.
Always exercise caution when working with electronics and power sources.
This step-by-step guide provides a foundation for building your DIY Fire Truck. Remember to experiment, learn, and have fun with the process!