
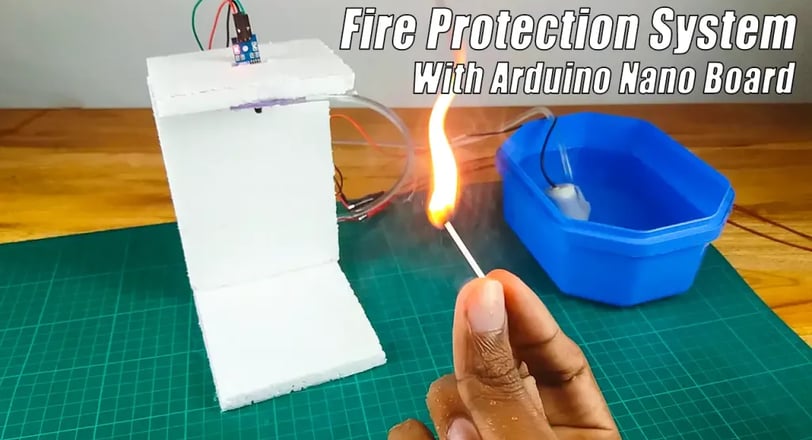
How to make a Fire protection system with Arduino
This project demonstrates a simple fire protection system using an Arduino Nano board and a flame sensor. When fire is detected, the system activates a buzzer to alert you and triggers a mini water pump to release water, helping to extinguish the flames. This low-cost and easy-to-build system provides basic fire protection for your home, office, or other areas. This description is concise and highlights the key features and purpose of the project.
SCIENCE PROJECTS
**"Welcome back! This project focuses on creating a basic Fire Protection System using an Arduino Nano board and a flame sensor.
<script type="text/javascript"> atOptions = { 'key' : '653b75a729eae92cdaffd6d73e2159a9', 'format' : 'iframe', 'height' : 90, 'width' : 728, 'params' : {} }; </script> <script type="text/javascript" src="//www.highperformanceformat.com/653b75a729eae92cdaffd6d73e2159a9/invoke.js"></script>
Key Features:
Low-Cost & Easy: Affordable and straightforward to build.
Sprinkler System: Releases water automatically when fire is detected.
Early Warning: Activates a buzzer to alert you to potential fire hazards.
Customizable: Can be expanded and adapted for various applications.
Versatile: Suitable for home, office, and other fire-prone areas.
Project Overview:
This system operates as follows:
Flame Detection: The flame sensor detects the presence of fire.
Alarm Activation: The buzzer sounds to alert individuals.
Water Release: The system activates a mini water pump to release water, helping to extinguish the fire.
Note: This is a basic implementation. You can enhance it with features like temperature sensors, smoke detectors, and more sophisticated water spraying mechanisms."
And here's the revised component list:
OK, let’s do this project step by step. The required components are given below.
Arduino Nano board x 1
Flame sensor x 1
Relay module x 1
Buzzer x 1
Breadboard x 1
Jumper wires
Mini water pump
Mini water pipe
Making Process: Step-by-Step
1. Gather Materials:
Arduino Nano board
Flame sensor
Relay module
Buzzer
Breadboard
Jumper wires
Mini water pump
Mini water pipe
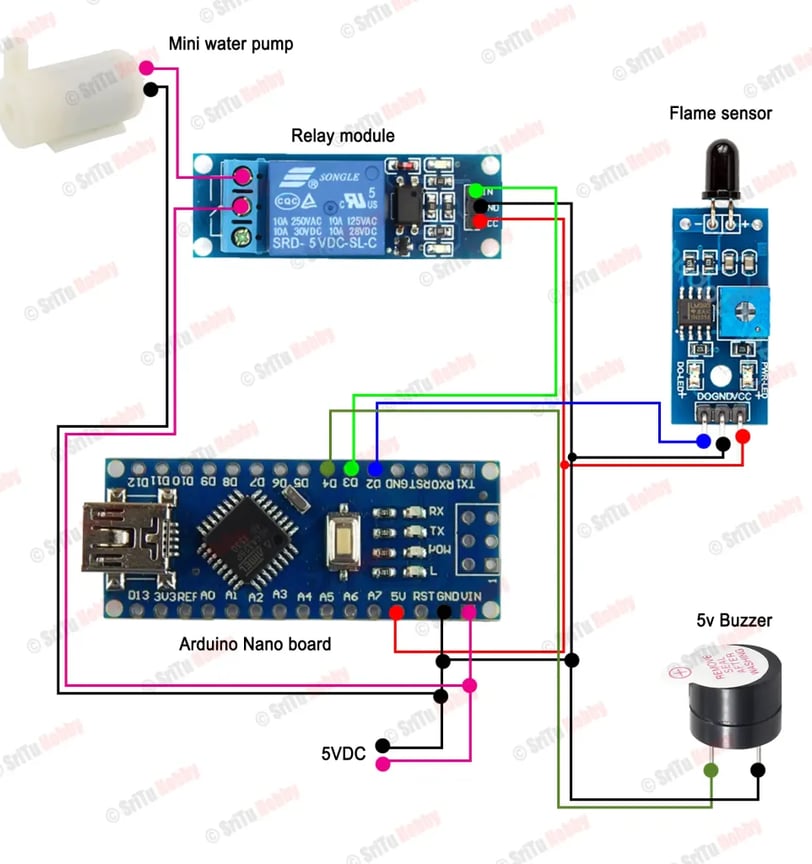
2. Connect Components:
Power Supply:
Connect the Arduino Nano board and other components to a suitable power source (e.g., 5V DC power supply).
Flame Sensor:
Connect the VCC pin of the flame sensor to 5V.
Connect the GND pin of the flame sensor to ground.
Connect the output pin (usually labeled as "DO") of the flame sensor to a digital input pin on the Arduino.
Buzzer:
Connect one leg of the buzzer to a digital output pin on the Arduino.
Connect the other leg of the buzzer to ground.
Relay Module:
Connect the VCC and GND pins of the relay module to 5V and ground, respectively.
Connect the input pin of the relay module to a digital output pin on the Arduino.
Connect the output pin of the relay module to the positive terminal of the water pump.
Connect the negative terminal of the water pump to ground.
3. Develop and Upload Code:
Arduino Code
/*Fire protection system with Arduino */ #define flame 2 #define relay 3 #define buzzer 4 void setup() { Serial.begin(9600); pinMode(flame, INPUT); pinMode(relay, OUTPUT); pinMode(buzzer, OUTPUT); digitalWrite(relay, HIGH); } void loop() { bool Svalue = digitalRead(flame); if (Svalue == 0) { digitalWrite(relay, LOW); digitalWrite(buzzer, HIGH); delay(300); digitalWrite(buzzer, LOW); delay(300); digitalWrite(buzzer, HIGH); delay(300); digitalWrite(buzzer, LOW); delay(300); digitalWrite(buzzer, HIGH); delay(300); digitalWrite(buzzer, LOW); } else { digitalWrite(relay, HIGH); } }
Write the Code:
Use the Arduino IDE to write the code.
The code should:
Read the digital input from the flame sensor.
If the flame sensor detects fire (output is HIGH):
Activate the buzzer by setting the corresponding digital output pin HIGH.
Activate the relay by setting the corresponding digital output pin HIGH, thereby turning on the water pump.
If no fire is detected:
Deactivate the buzzer by setting the corresponding digital output pin LOW.
Deactivate the relay by setting the corresponding digital output pin LOW, turning off the water pump.
Upload the Code:
Connect the Arduino Nano board to your computer via USB.
Upload the compiled code to the Arduino Nano board using the Arduino IDE.
4. Test and Calibrate:
Power On: Power on the system.
Test Flame Detection: Simulate a fire (e.g., using a candle or a lighter) near the flame sensor.
Verify that the buzzer sounds.
Verify that the water pump activates.
Test False Alarms: Test the system in normal conditions to ensure that it doesn't trigger false alarms.
Adjust Sensitivity: If necessary, adjust the sensitivity of the flame sensor to minimize false alarms.
5. Refine and Customize (Optional):
Add Enhancements:
Incorporate a temperature sensor to provide additional fire detection.
Add a smoke detector for early warning.
Implement a more sophisticated water spraying mechanism.
Integrate with a home security system for remote monitoring and control.
Improve Aesthetics:
Enclose the system in a suitable enclosure.
Improve the overall appearance of the system.
Note:
This is a basic implementation. The specific wiring and code may vary depending on the components you use and the desired features.
Refer to the datasheets of the components for detailed specifications and pinouts.
Always exercise caution when working with electricity and water.
This step-by-step guide provides a foundation for building your basic Fire Protection System. Remember to experiment, learn, and prioritize safety throughout the process.