
How to make a security system with the ESP32 board | ESP32 with WhatsApp
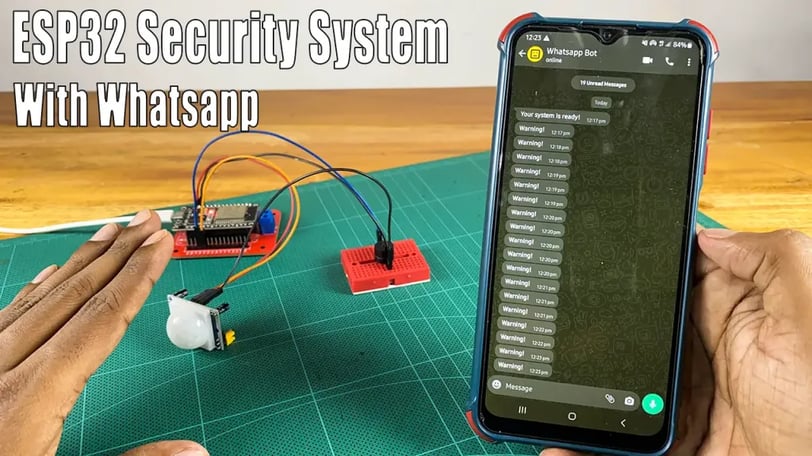
Certainly! Here's a short description of the project: **This project demonstrates a simple home security system. It utilizes an ESP32 board, a PIR motion sensor, and a buzzer to detect and alert you to any movement within its range. You'll receive instant notifications via WhatsApp, providing an added layer of security for your home or workspace.** This description is concise and highlights the key features and benefits of the project.
SCIENCE PROJECTS
Here's a rewritten version of the provided text:
**"Welcome back! In this project, we'll explore how to build a basic security system using an ESP32 board.
Key Components:
PIR Motion Sensor: Detects movement within its range, triggering alerts.
WhatsApp Notifications: Receive instant alerts on your phone for added security.
5V Buzzer: Provides a simple audible alarm.
Project Overview:
This project demonstrates a simple security system. When the PIR sensor detects motion, it triggers an alert. You'll receive a WhatsApp notification, and the buzzer will sound. This provides a basic level of security for your home or workspace.
API Integration:
We utilize the free CallMeBot API service to send WhatsApp notifications. For more information on the CallMeBot API, please visit the [CallMeBot website](link to CallMeBot website)."
Key Improvements:
Conciseness: The text is more concise and easier to read.
Clarity: The project's purpose and functionality are clearly explained.
Structure: The information is presented in a more organized and structured manner.
Professionalism: The tone is more professional and engaging.
I hope this revised version is more effective!
Here's the revised text with the specified removals:
let’s do this project step by step. The required components are given below.
ESP32 DEVKIT V1 board
ESP32 Adapter
PIR sensor
Buzzer
Breadboard
Jumper wires
Making Process: Step-by-Step
Gather Materials:
ESP32 DEVKIT V1 board
ESP32 Adapter
PIR motion sensor
Buzzer
Breadboard
Jumper wires
Connect Components:
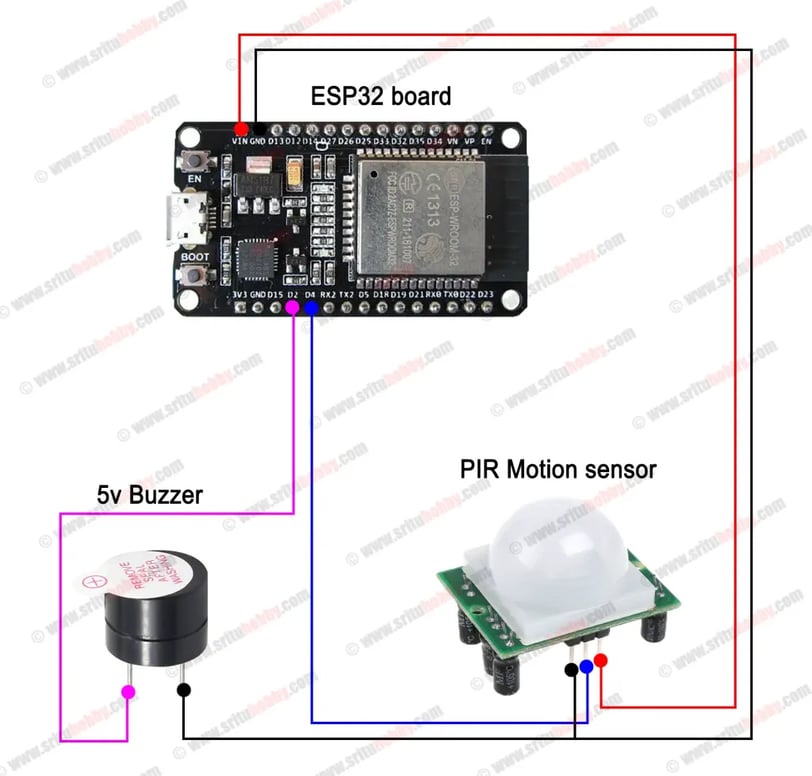
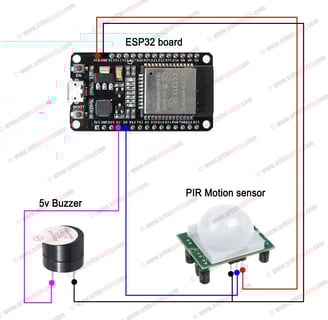
Power: Connect the ESP32 board to the adapter and power it on.
PIR Sensor:
Connect the VCC pin of the PIR sensor to 3.3V on the ESP32 board.
Connect the GND pin of the PIR sensor to the GND pin on the ESP32 board.
Connect the OUT pin of the PIR sensor to a digital input pin on the ESP32 board (e.g., GPIO 2).
Buzzer:
Connect one leg of the buzzer to a digital output pin on the ESP32 board (e.g., GPIO 4).
Connect the other leg of the buzzer to the GND pin on the ESP32 board.
Develop Code:
Use the Arduino IDE or a similar development environment to write the code for the ESP32.
The code should:
Read the digital input from the PIR sensor.
If motion is detected (PIR sensor output is HIGH):
Send a WhatsApp notification using the CallMeBot API.
Activate the buzzer by setting the corresponding digital output pin HIGH.
If no motion is detected:
Deactivate the buzzer by setting the corresponding digital output pin LOW.
Upload Code:
Connect the ESP32 board to your computer via USB.
Upload the compiled code to the ESP32 board using the Arduino IDE or a similar tool.
Arduino Code :#include <WiFi.h> #include <HTTPClient.h> #include <UrlEncode.h> #define Buzzer 2 #define Sensor 4 const char* ssid = "SSID";//Enter your SSID const char* password = "PASSWORD";//Enter your password String phoneNumber = "PHONE_NUMBER"; //country_code + phone number String apiKey = "API_KEY"; void setup() { Serial.begin(115200); pinMode(Buzzer, OUTPUT); pinMode(Sensor, INPUT); WiFi.begin(ssid, password); Serial.println("Connecting"); while (WiFi.status() != WL_CONNECTED) { delay(500); Serial.print("."); } Serial.println(""); Serial.print("Connected to WiFi network with IP Address: "); Serial.println(WiFi.localIP()); // Send Message to WhatsAPP sendAlert("Your system is ready!"); } void loop() { bool sensorValue = digitalRead(Sensor); if (sensorValue == 1) { digitalWrite(Buzzer, HIGH); sendAlert("Warning!"); } else { digitalWrite(Buzzer, LOW); } } void sendAlert(String message) { // Data to send with HTTP POST String url = "https://api.callmebot.com/whatsapp.php?phone=" + phoneNumber + "&apikey=" + apiKey + "&text=" + urlEncode(message); HTTPClient http; http.begin(url); // Specify content-type header http.addHeader("Content-Type", "application/x-www-form-urlencoded"); // Send HTTP POST request int httpResponseCode = http.POST(url); if (httpResponseCode == 200) { Serial.print("Message sent successfully"); } else { Serial.println("Error sending the message"); Serial.print("HTTP response code: "); Serial.println(httpResponseCode); } // Free resources http.end(); }
Test the System:
Power on the system.
Simulate motion in front of the PIR sensor.
Verify that:
A WhatsApp notification is received.
The buzzer sounds.
Fine-tune and Refine:
Adjust the sensitivity of the PIR sensor as needed.
Experiment with different notification methods (e.g., SMS, email).
Enhance the system with additional features (e.g., temperature and humidity monitoring, camera integration).
Note:
This is a basic outline. The specific code and wiring will vary depending on your implementation and the libraries you use.
Ensure proper grounding and avoid short circuits.
Refer to the datasheets of the components for detailed specifications and pinouts.
This step-by-step guide provides a general framework for building your simple home security system. Remember to consult the documentation and online resources for more specific instructions and troubleshooting tips.