
How to make a simple radar system with Arduino UNO R4 WIFI board
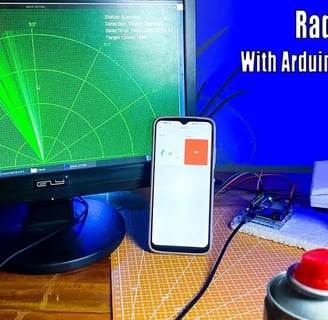
**Simple Radar System with Arduino UNO R4 WIFI** This project explores basic radar principles using an Arduino UNO R4 WIFI board. By transmitting and receiving ultrasonic signals, it measures the distance to objects. The Arduino processes the data and displays the distance on a connected device (e.g., LCD, computer). This project provides a hands-on introduction to radar technology and its applications.
SCIENCE PROJECTS

circuit diagram below.
It seems like you are asking for a more detailed description of how to set up a simple radar-like system using the Arduino UNO R4 WiFi. Here’s a comprehensive breakdown of the components, concepts, setup, and coding involved:
### Description of the Simple Radar System
#### Overview
The simple radar system using an Arduino UNO R4 WiFi primarily functions as a distance measurement tool. By using an ultrasonic sensor (like the HC-SR04), this system emits ultrasonic waves and measures how long it takes for those waves to bounce back from an object. This information can help determine the distance to the object, simulating a radar-like functionality.
#### Key Components
1. Arduino UNO R4 WiFi: This microcontroller board allows for programming and connectivity options like WiFi, enhancing the functionality of your project if you choose to send data remotely.
2. HC-SR04 Ultrasonic Sensor: This sensor has two main components:
- Trigger Pin: Sends out an ultrasonic wave.
- Echo Pin: Receives the reflected wave. The duration between sending and receiving this wave helps calculate the distance.
3. Breadboard and Jumper Wires: Used to easily connect all components without soldering.
4. Optional LEDs: For visual indicators of distance (e.g., turning on an LED if an object is detected within a certain range).
5. Computer with Arduino IDE: To write and upload code to the Arduino.
#### Working Principle
1. The ultrasonic sensor sends out a high-frequency sound wave when triggered.
2. The wave travels through the air until it hits an object and reflects back.
3. The time it takes for the sound wave to return is measured, and this time is used to calculate the distance using the speed of sound (approximately 343 meters per second).
#### Circuit Setup
1. Ultrasonic Sensor Wiring:
- Connect the VCC pin of the HC-SR04 to the 5V pin on the Arduino.
- Connect the GND pin of the HC-SR04 to a GND pin on the Arduino.
- Connect the Trig pin of the HC-SR04 to a digital pin (for example, pin 9).
- Connect the Echo pin of the HC-SR04 to another digital pin (for example, pin 10).
2. Optional: If using LEDs for distance indication, connect them to the Arduino through resistors.
#### Sample Code
Here’s the Arduino code used to measure the distance with the HC-SR04 sensor:
```cpp
// Define ultrasonic sensor pins
const int trigPin = 9; // Trigger pin connected to digital pin 9
const int echoPin = 10; // Echo pin connected to digital pin 10
void setup() {
Serial.begin(9600); // Start Serial communication at 9600 baud
pinMode(trigPin, OUTPUT); // Set the trigPin as an OUTPUT
pinMode(echoPin, INPUT); // Set the echoPin as an INPUT
}
void loop() {
long duration, distance;
// Clear the trigPin
digitalWrite(trigPin, LOW);
delayMicroseconds(2);
// Set the trigPin HIGH for 10 microseconds
digitalWrite(trigPin, HIGH);
delayMicroseconds(10);
digitalWrite(trigPin, LOW);
// Read the echoPin: returns the sound wave travel time in microseconds
duration = pulseIn(echoPin, HIGH);
// Calculate distance (distance = duration × speed of sound / 2)
distance = (duration / 2) * 0.0343; // Convert duration to distance in cm
// Print the distance to the Serial Monitor
Serial.print("Distance: ");
Serial.println(distance);
delay(1000); // Wait for a second before the next measurement
}
```
### Compiling and Running:
1. Open the Arduino IDE.
2. Connect your Arduino UNO R4 to your computer via USB.
3. Copy and paste the code above into the IDE.
4. Select the correct Arduino board and port from the Tools menu.
5. Upload the code to the Arduino.
6. Open the Serial Monitor to see distance measurements in real time.
### Summary
This simple radar system with Arduino using an HC-SR04 sensor can effectively measure distances. You can expand on this project by incorporating additional features such as:
- WiFi integration to send distance data to a server or to display it on a web page.
- Conditional logic to activate LEDs based on distance thresholds.
- Displaying data on an LCD or using a mobile app to make it more interactive.
If you need further clarification on any part of this process or wish to explore additional enhancements, feel free to ask!