
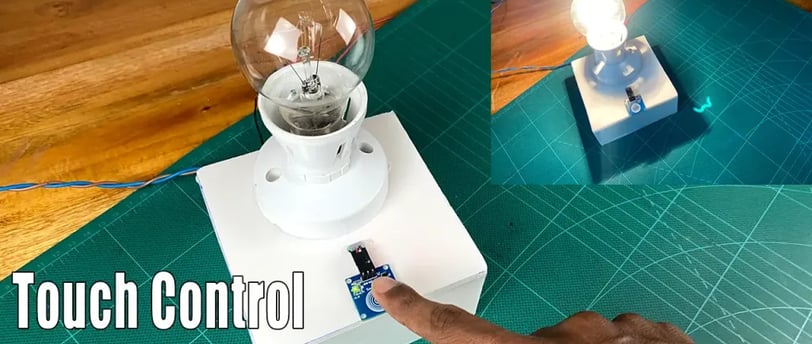
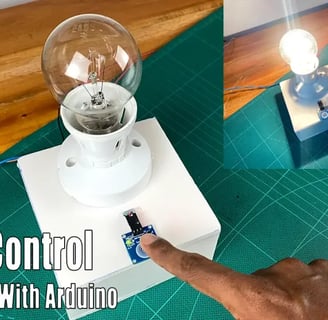
How to make a touch control table lamp with Arduino
Here's a short description of the touch-controlled table lamp project: **This project demonstrates the creation of a table lamp that can be turned on and off with a simple touch. It utilizes an Arduino board, a touch sensor, and a relay module to achieve touch-sensitive control. The lamp can be powered by AC voltage or a safer 12V LED option.** This description is concise and highlights the key features and functionalities of the project.
SCIENCE PROJECTS
Here's a rewritten version of the provided text:
Introducing a Touch-Controlled Table Lamp with Arduino
This project guides you through building a touch-sensitive table lamp using an Arduino board.
Key Components:
Touch Sensor: Detects user input.
Relay Module: Controls the power to the lamp.
Arduino Board: (UNO R4 MIMINA recommended, but others compatible)
Lamp Body: 5mm foam board (or low-cost cardboard)
Power Options:
AC Bulb: Requires an AC 230V supply to the relay module. Exercise caution when handling AC voltage.
12V LED: A safer and more energy-efficient alternative.
Power Supply: 5VDC power supply recommended for stable operation (USB power is also an option).
This project demonstrates a simple yet effective way to incorporate touch control into a lighting fixture using readily available components.
Key Improvements:
Clearer and more concise language.
Emphasis on safety: Highlighting the risks associated with AC voltage.
Enhanced readability: Using bullet points to organize information.
Improved project overview: Providing a concise summary of the project's goals.
I hope this revised version is more engaging and informative!
If you want to learn what’s touch sensor is and how to use it with Arduino, please use this link.
OK, let’s do this project step by step. The required components are given below.
Arduino UNO R4 MINIMA
Touch sensor
5v Relay module
Jumper wires
AC Bulb holder
AC bulb
AC Plug top
TT wires
5mm Foam Board
This version is more concise and professional by removing the unnecessary store links.
Making a Touch-Controlled Table Lamp with Arduino
Step 1: Gather Materials
Arduino UNO R4 MINIMA
Touch sensor
5v Relay module
Jumper wires
AC Bulb holder
AC bulb
AC Plug top
TT wires
5mm Foam Board
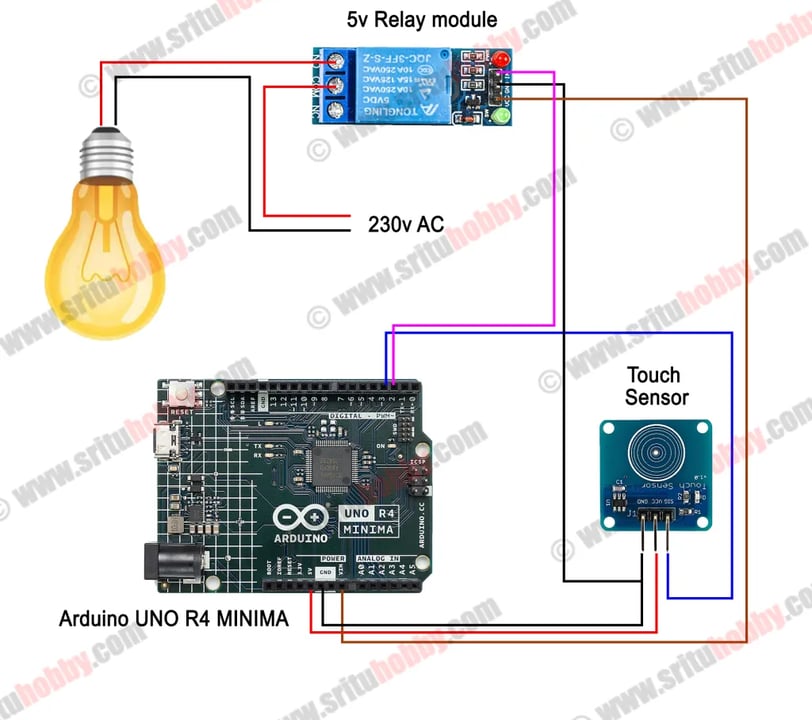
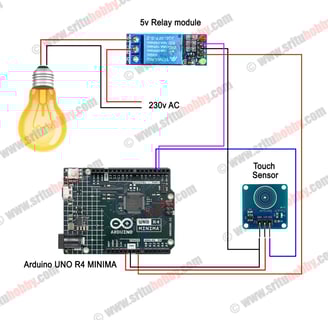
Step 2: Circuit Connections
Connect the Touch Sensor:
Connect one pin of the touch sensor to a digital pin on the Arduino (e.g., pin 2).
Connect the other pin of the touch sensor to ground.
Connect the Relay Module:
Connect the IN pin of the relay module to a digital pin on the Arduino (e.g., pin 3).
Connect the VCC pin of the relay module to 5V.
Connect the GND pin of the relay module to ground.
Connect the Power Supply:
Connect the 5V and ground pins of the Arduino to a 5V power source (e.g., a USB port or an external power supply).
Step 3: Create the Lamp Body
Cut the Foam Board: Cut pieces of foam board to create the base and sides of your lamp.
Assemble the Lamp: Use glue or tape to assemble the foam board pieces into the desired lamp shape.
Integrate Components: Carefully incorporate the touch sensor, relay module, and other electronic components into the lamp body.
Step 4: Write the Arduino Code
Arduinos code
#define sensor 3 #define relay 2 bool value; bool checkOne; bool checkTwo = true; void setup() { Serial.begin(9600); pinMode(sensor, INPUT); pinMode(relay, OUTPUT); digitalWrite(relay, HIGH); } void loop() { value = digitalRead(sensor); if (value == 1) { if (checkOne) { Serial.println("ON"); digitalWrite(relay,LOW); checkTwo = false; } else { Serial.println("OFF"); digitalWrite(relay,HIGH); checkTwo = true; } } else if (value == 0) { if (checkTwo == true) { checkOne = true; } else { checkOne = false; } } }Step 5: Upload the Code
Connect the Arduino board to your computer using a USB cable.
Upload the Arduino code to the board using the Arduino IDE.
Step 6: Test and Enjoy
Apply power to the lamp.
Gently touch the touch sensor to turn the lamp on and off.
Note:
Safety First: Always exercise caution when working with electricity.
Alternative Power Sources: If using an AC bulb, ensure proper wiring and grounding for safety. Consider using a 12V LED bulb for a safer and more energy-efficient option.
Customization: Customize the lamp's appearance and functionality by adding features like dimming control or different lighting modes.
This detailed guide provides a step-by-step approach to building your own touch-controlled table lamp. Remember to experiment and have fun with the process!
Disclaimer: This guide provides general instructions. Always refer to the datasheets of the specific components you are using for detailed information and safety precautions.