
How to use the AS608 Fingerprint sensor with Arduino
**Fingerprint Sensor with Arduino** This project explores the use of the AS608 fingerprint sensor with an Arduino board. By integrating the sensor and implementing appropriate code, you can create applications such as access control systems, attendance tracking, and personalized device unlocking. This concise description highlights the core functionality and potential applications of using the AS608 fingerprint sensor with Arduino.
SCIENCE PROJECTS
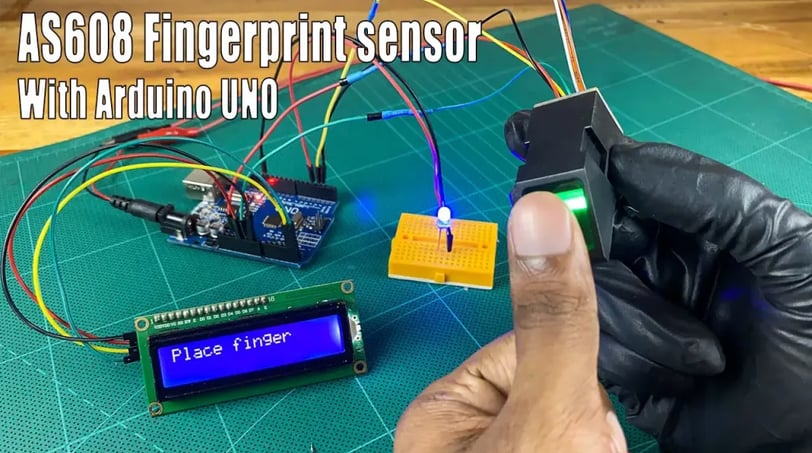
Hello and welcome back! In this tutorial, we’ll learn how to use the AS608 Fingerprint sensor with Arduino. For that, I used the Arduino UNO board, LCD screen, LED bulb, and resistor, but you can use any other Arduino board. This tutorial is important because it can help you make biometric attendance and registration systems, Home security systems, door lock systems, safety boxes, and more, depending on your needs.
OK, let’s do it step by step. The required components are given below.
Arduino UNO board
AS608 Fingerprint sensor
LCD screen
I2C module
LED bulb
100-ohm Resistor
Jumper wires
Mini breadboard
Okay, let's break down how to use the AS608 fingerprint sensor with an Arduino step-by-step. This will involve several stages:
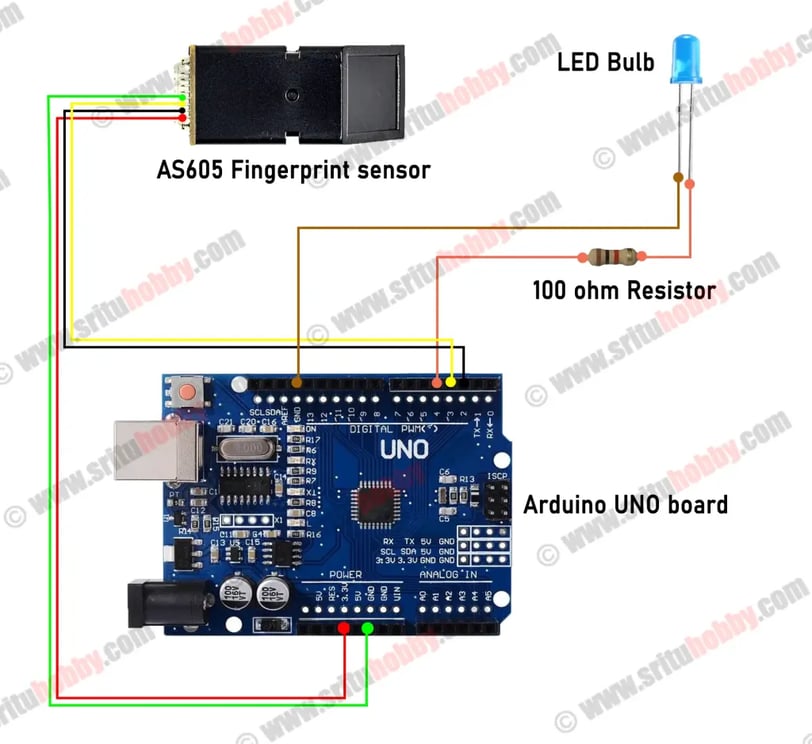
1. Hardware Setup and Wiring:
* Gather Components: Ensure you have all the necessary components (Arduino UNO, AS608 sensor, LCD screen, I2C module, LED, resistor, jumper wires, breadboard).
* Connect the AS608: Refer to the AS608's datasheet for the exact pinout. Typically, you'll need to connect VCC, GND, TXD, and RXD to your Arduino. The TXD and RXD lines will likely require a level shifter if the sensor's voltage is different from the Arduino's (commonly 3.3V vs 5V).
* Connect the LCD: Connect your LCD screen to the Arduino using the I2C module. Consult your LCD's and I2C module's documentation for specifics. This usually involves connecting VCC, GND, SDA, and SCL.
* Connect the LED: Connect the LED and 100-ohm resistor to the Arduino. The resistor protects the LED from damage. The longer leg of the LED goes to the positive pin, and the shorter leg to the negative. Connect the positive side through the resistor to an Arduino digital pin.
* Breadboard Connections: Use the breadboard to neatly organize all connections.
2. Software Setup:
* Install Libraries: You'll need an Arduino library to communicate with the AS608. Search for "AS608 Fingerprint library" on the Arduino IDE Library Manager. Install the appropriate one (there might be several versions). You'll also need a library for your LCD if it's not a standard one.
* Arduino Code: Write the Arduino code to handle the communication. This code will typically include functions for:
* Initialization: Setting up the serial communication, LCD, and pin modes.
* Enroll Fingerprint: A function to enroll new fingerprints.
* Search Fingerprint: A function to search for an enrolled fingerprint.
* Verification: Comparing a scanned fingerprint with enrolled fingerprints.
* Output: Displaying the results on the LCD and controlling the LED.
3. Testing and Calibration:
* Upload Code: Upload the Arduino code to your board.
* Enroll Fingerprints: Use the `enrollFingerprint` function to enroll fingerprints. Follow the sensor's instructions on how to place your finger.
* Test Verification: Use the `searchFingerprint` function to test the fingerprint recognition.
* Adjustments: Fine-tune your code and wiring based on the results.
I can help with specific details at each step if you get stuck. For example, which pins to use, specific code snippets, or troubleshooting common problems. Which step would you like to explore further first?
Arduino Code
#include <LiquidCrystal_I2C.h> #include <Adafruit_Fingerprint.h> LiquidCrystal_I2C dis(0x27, 16, 2); SoftwareSerial mySerial(2, 3); // TX/RX Adafruit_Fingerprint finger = Adafruit_Fingerprint(&mySerial); uint8_t id; void setup() { Serial.begin(9600); dis.init(); dis.backlight(); dis.setCursor(0, 0); dis.print("Place finger"); while (!Serial); // For Yun/Leo/Micro/Zero/... delay(100); Serial.println("\n\nAdafruit Fingerprint sensor enrollment"); // set the data rate for the sensor serial port finger.begin(57600); if (finger.verifyPassword()) { Serial.println("Found fingerprint sensor!"); } else { Serial.println("Did not find fingerprint sensor :("); while (1) { delay(1); } } finger.getParameters(); } uint8_t readnumber(void) { uint8_t num = 0; while (num == 0) { while (! Serial.available()); num = Serial.parseInt(); } return num; } void loop() { // run over and over again Serial.println("Ready to enroll a fingerprint!"); Serial.println("Please type in the ID # (from 1 to 127) you want to save this finger as..."); id = readnumber(); if (id == 0) {// ID #0 not allowed, try again! return; } Serial.print("Enrolling ID #"); Serial.println(id); while (! getFingerprintEnroll() ); } uint8_t getFingerprintEnroll() { int p = -1; Serial.print("Waiting for valid finger to enroll as #"); Serial.println(id); while (p != FINGERPRINT_OK) { p = finger.getImage(); switch (p) { case FINGERPRINT_OK: Serial.println("Image taken"); break; case FINGERPRINT_NOFINGER: //Serial.println("."); break; case FINGERPRINT_PACKETRECIEVEERR: Serial.println("Communication error"); break; case FINGERPRINT_IMAGEFAIL: Serial.println("Imaging error"); break; default: Serial.println("Unknown error"); break; } } // OK success! p = finger.image2Tz(1); switch (p) { case FINGERPRINT_OK: Serial.println("Image converted"); break; case FINGERPRINT_IMAGEMESS: Serial.println("Image too messy"); return p; case FINGERPRINT_PACKETRECIEVEERR: Serial.println("Communication error"); return p; case FINGERPRINT_FEATUREFAIL: Serial.println("Could not find fingerprint features"); return p; case FINGERPRINT_INVALIDIMAGE: Serial.println("Could not find fingerprint features"); return p; default: Serial.println("Unknown error"); return p; } Serial.println("Remove finger"); delay(2000); p = 0; while (p != FINGERPRINT_NOFINGER) { p = finger.getImage(); } Serial.print("ID "); Serial.println(id); p = -1; Serial.println("Place same finger again"); while (p != FINGERPRINT_OK) { p = finger.getImage(); switch (p) { case FINGERPRINT_OK: Serial.println("Image taken"); break; case FINGERPRINT_NOFINGER: //Serial.print("."); break; case FINGERPRINT_PACKETRECIEVEERR: Serial.println("Communication error"); break; case FINGERPRINT_IMAGEFAIL: Serial.println("Imaging error"); break; default: Serial.println("Unknown error"); break; } } // OK success! p = finger.image2Tz(2); switch (p) { case FINGERPRINT_OK: Serial.println("Image converted"); break; case FINGERPRINT_IMAGEMESS: Serial.println("Image too messy"); return p; case FINGERPRINT_PACKETRECIEVEERR: Serial.println("Communication error"); return p; case FINGERPRINT_FEATUREFAIL: Serial.println("Could not find fingerprint features"); return p; case FINGERPRINT_INVALIDIMAGE: Serial.println("Could not find fingerprint features"); return p; default: Serial.println("Unknown error"); return p; } // OK converted! Serial.print("Creating model for #"); Serial.println(id); p = finger.createModel(); if (p == FINGERPRINT_OK) { Serial.println("Prints matched!"); } else if (p == FINGERPRINT_PACKETRECIEVEERR) { Serial.println("Communication error"); return p; } else if (p == FINGERPRINT_ENROLLMISMATCH) { Serial.println("Fingerprints did not match"); return p; } else { Serial.println("Unknown error"); return p; } Serial.print("ID "); Serial.println(id); dis.setCursor(0, 1); dis.print("ID: "); dis.print(id); p = finger.storeModel(id); if (p == FINGERPRINT_OK) { Serial.println("Stored!"); dis.print(" Stored!"); } else if (p == FINGERPRINT_PACKETRECIEVEERR) { Serial.println("Communication error"); return p; } else if (p == FINGERPRINT_BADLOCATION) { Serial.println("Could not store in that location"); return p; } else if (p == FINGERPRINT_FLASHERR) { Serial.println("Error writing to flash"); return p; } else { Serial.println("Unknown error"); return p; } return true; }