
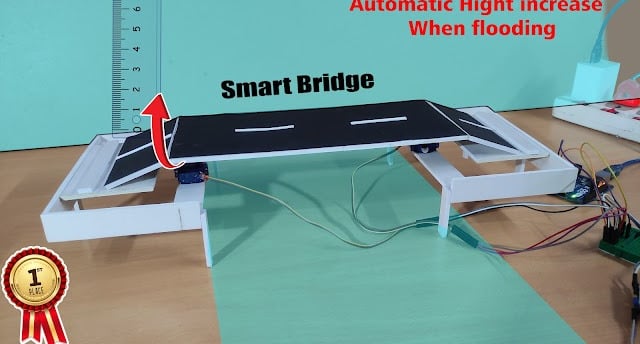
Smart Bridge - Automatic Hight increase when flooding | Best science Project
**Smart Bridge: Adapting to Floods** This project designs a bridge that automatically raises its height during floods, preventing damage and ensuring continued access. Utilizing sensors, actuators, and a control system, the bridge adapts to changing water levels, enhancing resilience and safety. This innovative solution offers a practical approach to mitigating the impact of flooding on critical infrastructure.
SCIENCE PROJECTS

### Smart Bridge: Making Process
The construction of the Smart Bridge involves several critical steps that combine engineering, technology, and environmental considerations. Here's a detailed overview of the making process:
#### 1. Conceptual Design
- Research and Development: Initiate with extensive research on existing flood management systems and hydraulic technologies.
- Design Blueprint: Create detailed designs that incorporate the height-adjustment mechanism, structural integrity, and safety features.
#### 2. Material Selection
- Sustainable Materials: Choose durable, weather-resistant, and eco-friendly materials for both the bridge structure and the elevation system.
- Component Procurement: Source hydraulic systems, sensors, and communication devices from reliable manufacturers.
#### 3. Engineering and Planning
- Structural Engineering: Collaborate with structural engineers to ensure the bridge can withstand heavy loads and extreme weather conditions.
- Hydraulic System Design: Engineer the hydraulic lift system that allows for smooth and rapid height adjustment in response to flood conditions.
#### 4. Construction of Bridge Components
- Foundation Work: Lay a strong foundation, including pylons or supports that will anchor the bridge securely.
- Bridge Deck Construction: Construct the bridge deck using prefabricated segments for efficiency, ensuring they are lightweight but sturdy.
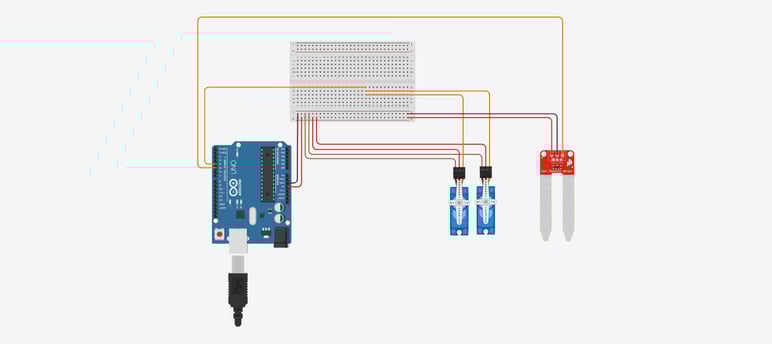
#### 5. Installation of Hydraulic Systems
- Hydraulic Mechanism: Install hydraulic cylinders and other components that will enable the bridge deck to rise and fall.
- Sensor Integration: Equip the bridge with water level sensors and environmental monitoring devices for real-time data collection.
#### 6. Electrical and Communication Setup
- Wiring and Programming: Complete the electrical wiring necessary for the bridge's control systems and safety features.
- Control Systems: Develop the software that will process sensor inputs and control the hydraulic lift mechanism automatically.
#### 7. Testing and Calibration
- System Testing: Perform rigorous testing on the hydraulic system and sensors to ensure reliability and accuracy.
- Calibration: Fine-tune the automation systems to react appropriately to varying water levels and environmental conditions.
#### 8. Final Inspection and Certification
- Safety Inspections: Conduct comprehensive safety assessments in compliance with regulations to ensure the bridge is fit for use.
- Certification: Obtain necessary certifications from relevant authorities confirming the structure meets safety and engineering standards.
#### 9. Installation
- Site Preparation: Prepare the installation site by clearing any obstacles and ensuring access routes are safe for transportation.
- Bridge Assembly: Assemble the bridge at the installation site, connecting all hydraulic and electrical systems.
#### 10. Public Education and Launch
- Awareness Campaign: Educate the local community about the bridge's features and operational protocols.
- Official Launch: Open the Smart Bridge for public use, highlighting its innovative design and benefits for flood management.
### Conclusion
The making process of the Smart Bridge entails a comprehensive approach that integrates modern engineering practices with innovative technology. By following these steps, the Smart Bridge aims not only to enhance flood resilience but also to serve as a model for future infrastructure projects that prioritize safety and sustainability.
### Smart Bridge: Making Process
code
//Arduino Code//
//Code by Harish Projects
//Orde science projects kit & electronics parts from "HarishProjects.com"
#include <Servo.h> //Install this library
Servo tap_servo;
int sensor_pin = 5; //Connect D5 of Arduino
int tap_servo_pin =4; //Connect D4 of Arduino
int val;
void setup(){
pinMode(sensor_pin,INPUT);
tap_servo.attach(tap_servo_pin);
}
void loop(){
val = digitalRead(sensor_pin);
if (val==0)
{tap_servo.write(0);
}
if (val==1)
{tap_servo.write(90); //If you want you can increase & Decrease servo rotation
}
}