
Smart Shoes for Blind Persons / Intelligent walking Shoes / Best Science Project
Smart Shoes for Blind Persons / Intelligent walking Shoes / Best Science Project Smart Shoes, Blind Assistance, Intelligent Walking Shoes, Assistive Technology, Obstacle Detection Shoes, Arduino Projects, Robotics for Accessibility, Haptic Feedback Shoes, Wearable Technology, Blind Navigation, Science Project, Innovative Design, Electronics Project, Blindness Solutions, Mobility Aid, Smart Footwear, Real-Time Obstacle Detection, DIY Assistive Device, Navigation Support, Sustainable Technology
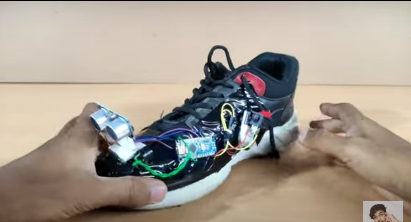
SCIENCE PROJECTS

//........Arduino Code.........
#define buzzer 6
void setup()
{
pinMode(12,OUTPUT);//Trigger
pinMode(13,INPUT);//EchoA
pinMode(6,OUTPUT);//Buzzer
}
void loop()
{
long duration, distance;
digitalWrite(12,LOW);
delayMicroseconds(2);
digitalWrite(12,HIGH);
delayMicroseconds(10);
digitalWrite(12,LOW);
duration=pulseIn(13,HIGH);
distance=(duration/2)/29.1;
if (distance < 70) // This is where checking the distance you can change the value
{
// When the the distance below 100cm
digitalWrite(6,HIGH);
} else
{
// when greater than 100cm
digitalWrite(6,LOW);
} delay(500);
}
Components Needed:
Arduino Board: Arduino Uno or Nano
Ultrasonic Sensors: For obstacle detection (e.g., HC-SR04)
Vibration Motors: To provide feedback to the user about obstacles (e.g., haptic feedback)
Power Supply: Batteries to power the Arduino and sensors
Breadboard & Jumper Wires: For prototyping the circuit
Speakers/Buzzer: Optional, for audio feedback
Shoes: A pair of shoes where all the components will be integrated
Resistors, Capacitors: Depending on the specific design
Steps to Create Smart Shoes:
Design the System:
Define the purpose of the shoe (e.g., detecting obstacles, providing directional guidance).
Plan how the sensors will be placed on the shoes.
Set Up the Arduino:
Install the Arduino IDE on your computer.
Connect the Arduino to your computer for programming.
Connect the Components:
Connect the ultrasonic sensors to the Arduino (trigger and echo pins) to measure distance.
Connect vibration motors to the digital pins on the Arduino. One can use a transistor if the motor operates at a higher voltage than the Arduino output.
Optionally connect a speaker or buzzer for audio feedback.
Write the Arduino Code:
Use the Arduino IDE to write a program that reads data from the ultrasonic sensors.
Implement logic to trigger the vibration motors when an obstacle is detected within a certain range. For example:
If an object is within 30 cm, activate the left motor for left direction, the right motor for the right direction, and both for front.
Include delays and thresholds to avoid false readings or constant vibrations.
Build the Prototype:
Secure the ultrasonic sensors on the front of the shoes to detect obstacles ahead.
Place the vibration motors strategically (such as on the sides) to provide directional feedback.
Ensure that the wiring is safely insulated and does not interfere with the wearer's movement.
Testing and Calibration:
Test the shoes in different environments to ensure they respond correctly to obstacles.
Make adjustments to the sensor ranges and vibration frequencies as needed.
Final Integration:
Once tested successfully, integrate all components within the shoe, ensuring comfort and functionality.
If desired, create a more permanent circuit board rather than using a breadboard.
Documentation:
Document the project with schematics, photographs, and descriptions to aid others in replicating it.
Additional Considerations:
User Feedback: Consult with users to refine the design and functionality.
Safety Measures: Ensure that all components are securely attached and that the shoes are safe to wear.
Expand Functionality: Consider adding features like GPS for navigation or a smartphone interface.