
Wet & Dry Waste Smart Dustbin for House | Best science Project
**Wet & Dry Waste Smart Dustbin** This innovative project presents a smart dustbin with separate compartments for wet and dry waste. Equipped with sensors and a microcontroller, it automatically segregates waste, reducing manual effort and promoting recycling. The system can also send alerts when compartments are full, optimizing waste collection.
SCIENCE PROJECTS


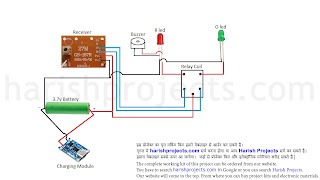


circuit diagram 1
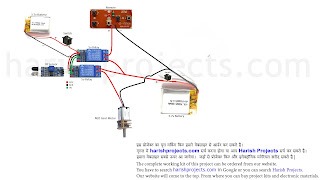
circuit diagram 2
### Making Process for Wet & Dry Waste Smart Dustbin
Creating the Wet & Dry Waste Smart Dustbin can be a fun and educational project. Here’s a step-by-step guide to help you build your own version:
#### Materials Needed:
1. Dustbin: Two separate bins or a dual-compartment dustbin.
2. Microcontroller: An Arduino or Raspberry Pi for controlling the separating mechanism.
3. Sensors: Proximity sensors (e.g., ultrasonic sensors) to detect waste type and weight sensors for monitoring capacity.
4. Servo Motors: For opening the compartments based on the detected waste.
5. LEDs: For indicators (green/red) showing the status of each compartment.
6. Power Supply: Batteries or a power adapter for the electronics.
7. Wires & Connectors: For connecting components.
8. Buzzer: For alerts when compartments are full.
9. Plastic sheet or cardboard: For housing compartments and the circuit.
10. Basic tools: Scissors, glue, drill, etc.
#### Steps to Build:
1. Design the Layout:
- Sketch a design of your smart dustbin, indicating where the sensors, compartments, and electronics will be located.
2. Prepare the Dustbins:
- If using two separate bins, label them clearly as "Wet Waste" and "Dry Waste."
- If using a dual-compartment bin, ensure it can be divided effectively.
3. Install Sensors:
- Mount proximity sensors at the top of the dustbin to detect when waste is dropped in.
- Optionally, install weight sensors in each compartment to monitor how full they are.
4. Set Up the Microcontroller:
- Connect the sensors and motors to the microcontroller (Arduino or Raspberry Pi).
- Program the microcontroller to respond to sensor inputs by activating the motors—opening the necessary compartment based on whether it detects wet or dry waste.
5. Programming:
- Write a simple code to control the sensors and motors:
- When a user throws waste, the sensor detects the presence of the waste.
- Depending on the detected type (wet or dry, which can be added as a parameter in the code), the corresponding compartment should open by activating the relevant servo motor.
- Program the LEDs and buzzer to indicate when either compartment is full.
6. Wire and Connect:
- Connect all components according to your schematic design. Ensure all sensors and motors are securely fitted.
- Test all connections to ensure they work properly.
7. Create an Indicator System:
- Set LEDs above each compartment to indicate when they’re full (e.g., red for full, green for empty).
- Integrate a buzzer to sound an alert when waste compartments need attention.
8. Test Your Project:
- Test the functionality by throwing different types of waste (tearing off small pieces of paper for dry waste and wet food scraps for wet waste) and ensure it correctly separates and manages the waste.
9. Finishing Touches:
- Decorate your dustbin to make it visually appealing. You can paint it or add labels to encourage proper waste disposal.
- Make sure the electronics are secured and well-protected from any potential spills or mess.
10. Presentation:
- Prepare a brief presentation on how the smart dustbin works, its benefits for waste management, and environmental impact to showcase during any science fairs or learning sessions.
#### Conclusion:
This process not only provides a hands-on learning experience about electronics and waste management, but also encourages responsible practices on recycling and separating waste at home. Enjoy your project!